You can do it, yes YOU! Build a DIY Toaster Rack!
I recently read Adam Savage’s book, Every Tool’s a Hammer, and it absolutely reinforced a notion I have that is one of the founding beliefs of this site. As we go through life, we build beliefs about who we are, what we do, and what we’re capable of. We’re usually wrong. What I mean, is that through these beliefs about who we are, we also decide, sometimes falsely, who we’re not. We end up needlessly placing self-limiting beliefs on ourselves.
We’ve got to be careful about this because, while having an identity/purpose/calling in life is important and can make us great at certain things, it can limit us in other ways if we let it. You might know where I’m going with this now….
We are capable of a great, many, varied things and we should embrace this possibility so as to improve, i.e. upgrade our lives. Learning new skills and having new experiences is awesome in and of itself, but it will also enrich your overall life. If you’re here reading this article, you’re probably already contemplating building a toaster rack, but just in case you’re on the fence, I’m here to tell you that if a career musician and knowledge worker, i.e. someone who doesn’t work with their hands a lot, can do it SO CAN YOU.
You Can Do Hard Things
Or even just unfamiliar things. You might be of a certain age, gender, background, etc. and so have decided that making things from wood, with powertools and such is just not your thing. However, it CAN be one of your things because it’s just like learning any other skill. Start with something simple and improve your skill from there. “Why would I want to do that?”, you may ask. Well, let me tell you why!
1- It’s empowering. I’m far from an expert in do-it-yourself or woodworking. And yet, I have some skills that I’ve picked up simply through the handful of projects I’ve decided to tackle. I’ve installed flooring in our house, and I’ve rebuilt the gate to our fence outside. Through just those projects alone I’ve gained experience that makes this little toaster rack project less intimidating. I feel capable, even if attempting something new and unfamiliar. If you start your journey with this toaster rack project, you’ll gain experience that will make the next project easier.
2- It’s immediately satisfying. At the end of this little build you’ll be able to stand back and see a fully functional piece that will be aesthetically pleasing and will make life in your home gym easier. Forever more, you can look and see the results of working with your hands and say to yourself, “I built that!”. It’ll be a reminder that you can build something for yourself and accomplish things (even if they’re small) that you set your mind to, even if they’re a little outside your comfort zone.
3- This can be the start of something bigger. If you build the toaster rack and are happy with it, and that’s the end of it then cool! However, if you step back and consider the bigger picture, this could be a foundational project, during which you learn some simple skills that you can then expand upon with future projects. Even if this is a super simple project for you, perhaps you can use it as a way to teach one of your kids about building things(?). In other words, this project can be the end goal, OR it could be the jumping off point to the next fun project/skillset.
4- Lastly, this project is simple, easy (attainable for a novice), and won’t cost you much in terms of money or time. We’re talking maybe $50 and an afternoon. A comparable bumper plate rack (metal) from Rogue Fitness is going to cost you $160-200. I personally think the wooden do-it-yourself version looks nicer.
Do I have you convinced yet?? Okay, if you’re ready to jump in then read on! We’re going to build something for ourselves, dammit!
How to Build Your Own DIY Bumper Plate Storage
Materials Needed
– 1×6’s (two or more 8 ft lengths)
– 1 box 2″ deck screws (I used tan colored Deckmate screws)
– Measuring tape
– Paper
– Pencil
– Power Drill with bits
– A saw of some kind (I used a miter saw)
All of these items can be readily purchased at your nearest home improvement store. The amount of lumber you’ll need will depend on how large a rack you want to build. If you need to buy the 1×6’s in a length other than 8 ft, you can certainly do that. When I was researching to build my own rack, I noticed several articles that suggest building with 2×4’s. You can definitely build a rack with 2×4’s, but in my opinion it’s unnecessary to get boards that thick. You could opt for 1×4’s but I went with 1×6’s, and the plates sit in the rack nicely with the extra height. I’ve had my rack, made out of 1×6’s, for several months now and it’s plenty sturdy and holding up well. 2×4’s will add bulk, take up additional space, cost more and will be a little harder to work with, particularly if you plan on hand sawing them. Go with 1×6’s (or 1×4’s).
You will need a power drill. The reason is that, although you can put screws in with a screwdriver just fine, you’re going to want to make pilot holes first. A pilot hole is a sort of preparatory hole that you’ll make for the screw before actually putting it in. If you don’t make these, you risk splitting the wood which you definitely don’t want. If you don’t have a power drill you can find some as low as $20, or you can just borrow one from a friend or neighbor.
I used a miter saw to make my cuts, which is definitely the route to go if you have one already and know how to operate it safely. However, you could cut through 1×6’s with a handsaw without too much trouble if that’s all you have. Just be aware that it will be more physically intensive and will take a while longer.
Step by Step Process to Build Your DIY Weight Storage
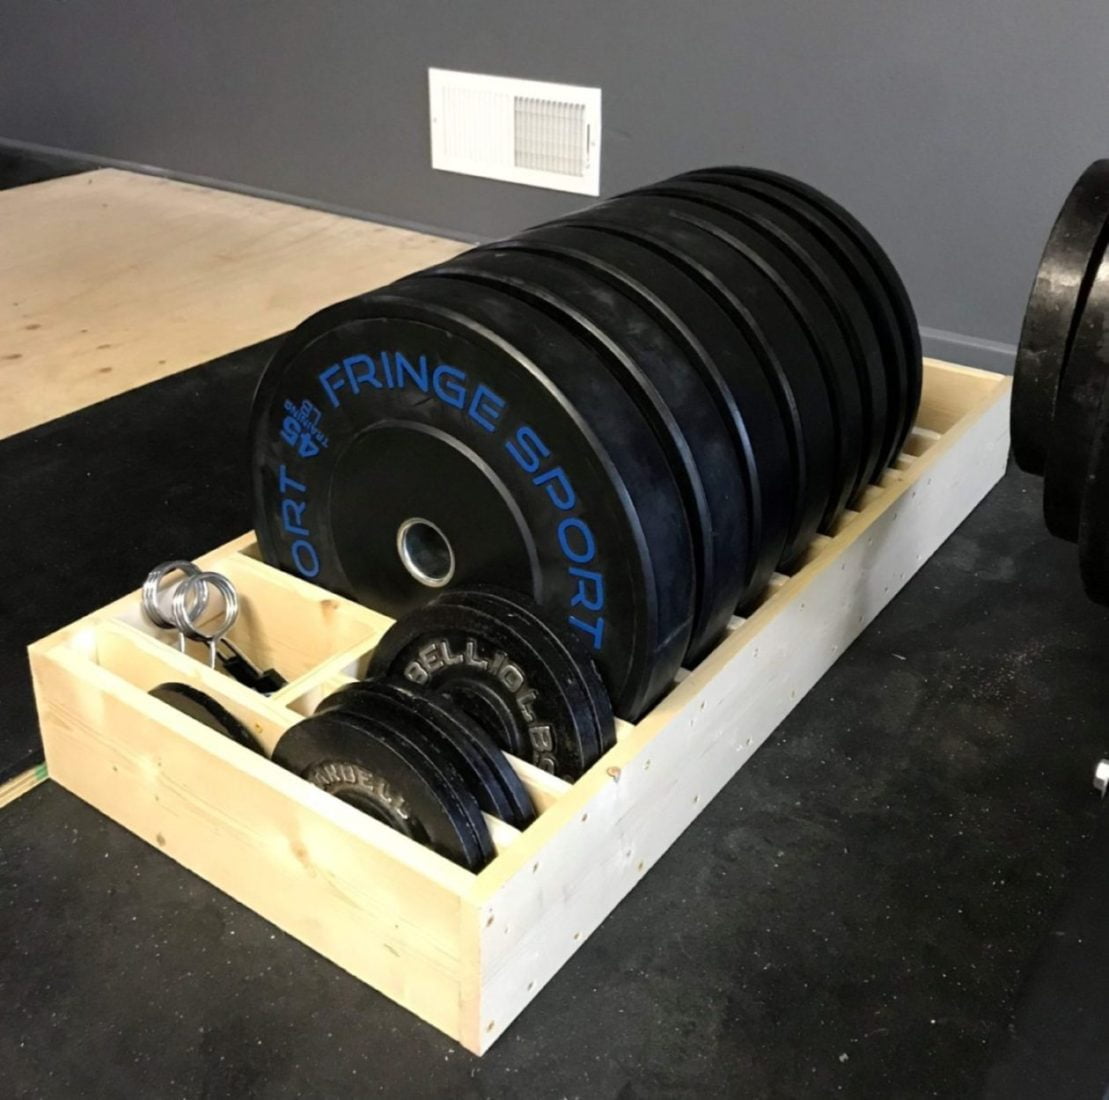
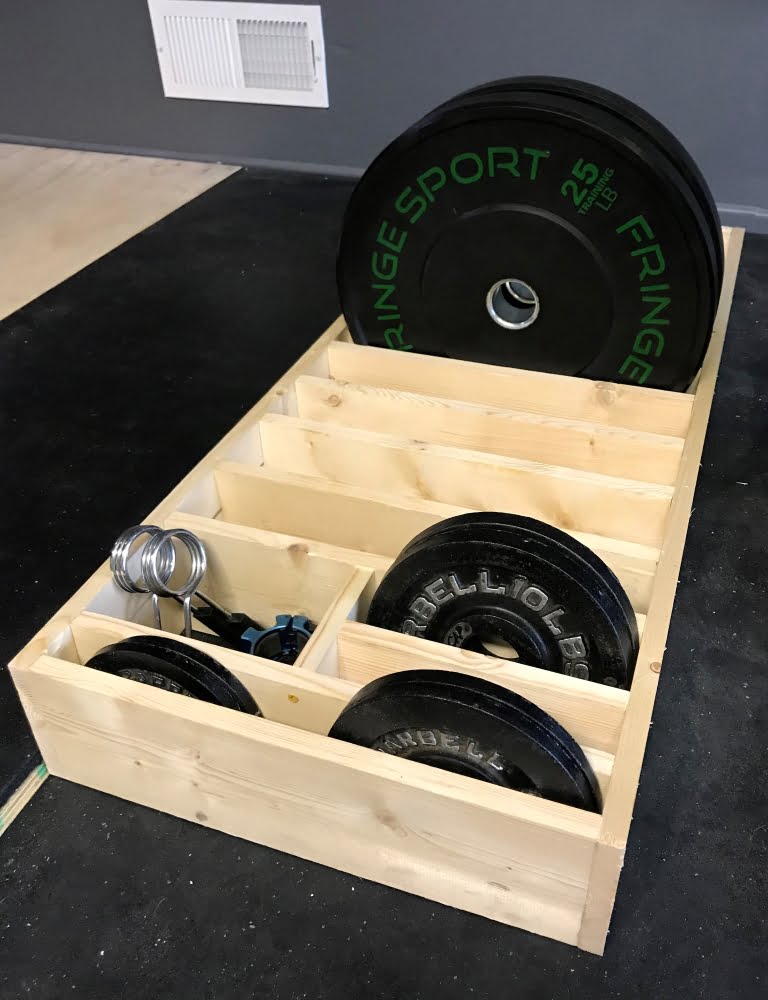
The first thing you’ll want to do is plan out the overall size of your toaster rack. Essentially, you’re going to make a big rectangle and then cut dividers to insert into the rectangle to separate the plates. I based my plans on the amount of plates I currently have and then left some room to add more plates in the future. I also left room for an organizer in the front for change plates and barbell collars. If you don’t need this then just leave it off.
The great thing is that you can customize the size and style of this rack to your own preferences! My rack’s dimensions are as follows- 45 ¼” long x 19 ⅜” wide. These might seem like odd measurements, and they kind of are. If you’d like to make things simple and make your rack 45” long x 19 ½” or 20” wide that’d be fine too. The reason I ended up at these measurements is because I based them on how things looked to me, using the actual bumper plates.
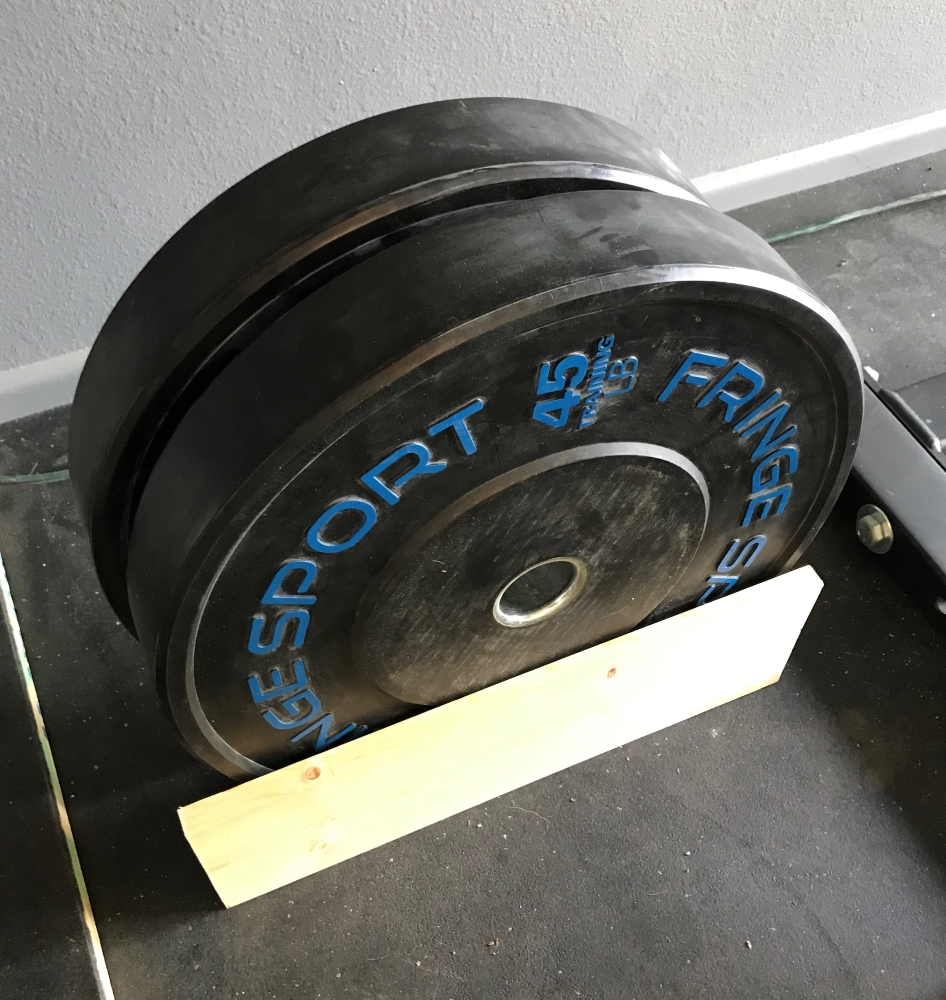
1. The first thing I did was line up a plate and decide how long the divider(s) would be. You’ll end up cutting a lot of these and they should all be uniform. Just leave a little extra room on either end so that the plate can move freely when you place it in and out of the rack.
For now just cut two dividers, so you can figure out the rest of the measurements you need. This way you can line them up on either side of a plate. Each of my dividers is about 17 ⅞” across. They’re actually just a hair shorter than this but that wasn’t intentional.

2. Now that you know how long the dividers will be, and therefore how wide the rack will be, you’ll need to figure out the overall length of the rack. You’re going to determine the space needed for each type of plate, add up all of those spaces needed for all plates and then add in the spaces for dividers.
Since each type of weight plate will probably be a different size (a 45 lb plate is bigger than a 10 lb plate), you’ll need to get the measurement for each of the spaces where that plate will rest. Stand up each type of plate with a divider on either side and record that space between the dividers.
Something to keep in mind here, is to not fit the dividers too closely to the plates. You want a little bit of space on either side of the plate so that it’s easy to place in the rack and pulls out freely. With one of the spaces I made, it’s just a little bit too snug, and so I have to place the plate just right to get it to slot in. It’s easier if there’s some wiggle room on either side.
Record the measurement of space you need between each divider for each type of weight plate. This may take a bit of guesswork, but after some trial and error you’ll get a feel for it. Continue this process for each size plate, and record all the space measurements until you’ve completed the process for all the plates you want to store. Obviously, if you figure out the space for a 45 lb plate and you have four of them, then just multiply by four, instead of continuing to line them up.
When I finished doing this for my own rack, I then thought about what plates I might buy in the future. I figured I’d eventually like to get a set of 55s and then either some 35s or some more 45s. I did look up the measurements for the plates I don’t own, and when estimating the space I needed to leave, I err’d on the side of leaving a little extra space rather than too little. For now, I’m just leaving that space in the back open and will add dividers if and when I do get plates in the future.
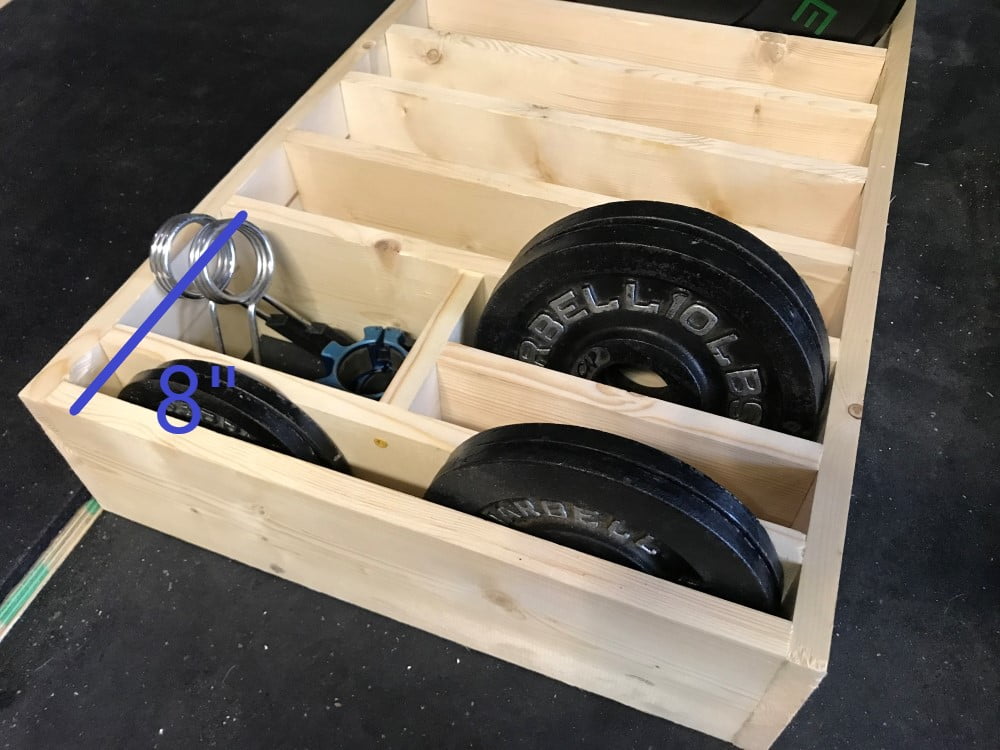
If you want, don’t forget to leave space in the front for your organizer. Mine is 7 ¼” in total depth with some extra organization as well. We’ll cover this organizer later, but if you’re not going to add an organizer then just skip this part.
3. Okay! Now that all of the nitty gritty measuring is done, you’ll want to add up the measurements of all the spaces and dividers and come up with an overall length for your side pieces. Careful when you do this that you’re adding up all the spaces and the depth for all the dividers, but not counting any of these twice. Double check and triple check your measurements and math! Once you’re ready, cut those side pieces and then cut as many dividers as you think you’ll need.
4. Now we’re ready to start assembling! For the basic rectangle, notice in the picture above that I put the longest boards on the outside. The reason for this is aesthetics for one, but more importantly, if you put them on the inside then your dividers will no longer be the right size to accommodate your plates. The space taken up by the side pieces will interfere with the plates slotting into the spaces. Put ’em on the outside!
Place one of the long pieces perpendicular to one of the dividers, which will serve as an end piece. I recommend attaching these with two screws- one at the top and one at the bottom. In pencil, mark where you’ll make your pilot hole at the top, centering it so that as the screw goes through the long piece it will enter the center of the end piece as well.
Once you’ve made your mark, you’ll go ahead and drill the pilot hole through the first board and into the second. You’ll want to hold the pieces together tightly so that when the drill bit passes through the first board it enters the second where you want it to. After you’ve done this, you’re ready to join these bad boys up! Go ahead and drill this first screw in through both boards, again keeping them held together nice and steady so that the holes line up and the screws passes through correctly. Putting this screw in will make putting the next one in easier. Go ahead and put the bottom screw in using the same method.
5. Boom! You’ve done it. Lining up and fastening those first two boards together is the trickiest part. From now on, you’ll have pieces attached and holding steady and that makes each future pilot hole and screw easier to put in. Now attach the long piece on the other side using the same method. Next, put the opposite end piece in and you’ve got your basic rack shape put together. Now it’s time to fill it with dividers!
6. One thing that I wish I’d done differently is place all the screws on the sides in line with each other. This would make it look cleaner and higher quality (attention to detail and all that), but it’s not a must. If you have a long straight edge, such as a 4 ft. level you could use that to draw a light pencil line that runs the length of the side piece for all the top screws. Then, draw another for the bottom screws and repeat on the other side piece. Now all those screws will look uniform and CLEAAAAAN. 👌🏼

Now, assuming you’re placing the organizer up front, measure 8″ in from the outside of the end piece and mark a light hash mark in pencil on one of the side pieces. This is where you’ll place the first plate divider (you’ll go back and take care of the organizer dividers later). Go ahead and grab that first divider and put it in without drilling anything yet. Measure again on one side and then the other to make sure you have the divider in there straight. Make any necessary adjustments. Once you’re satisfied, make pencil marks for all your holes along those handy dandy guidelines you just made. Drill pilot holes then put the screws in, securing the divider in place.
Boom! Now you’re ready to grab that first plate. This is where I’ll admit to being a little lazy, or I’ll say “more efficient with my energy expenditure”. You could continue to measure out spaces and insert dividers without ever consulting the bumpers (tedious🙄). However, there are slight variations between weight plates of the same kind and if you put the plate in there and secure the dividers around it, then you know it fits before you make it permanent. It’s also a nice little encouragement to see your rack begin to do its job! So that’s what I’d do. Put that first plate next to the first divider. Now place another divider on the other side, leaving a little looseness there so the fit isn’t too tight. Once you’re satisfied with the fit, make all your pencil marks, drill your pilot holes, and put in the screws. See? Pretty darn simple.
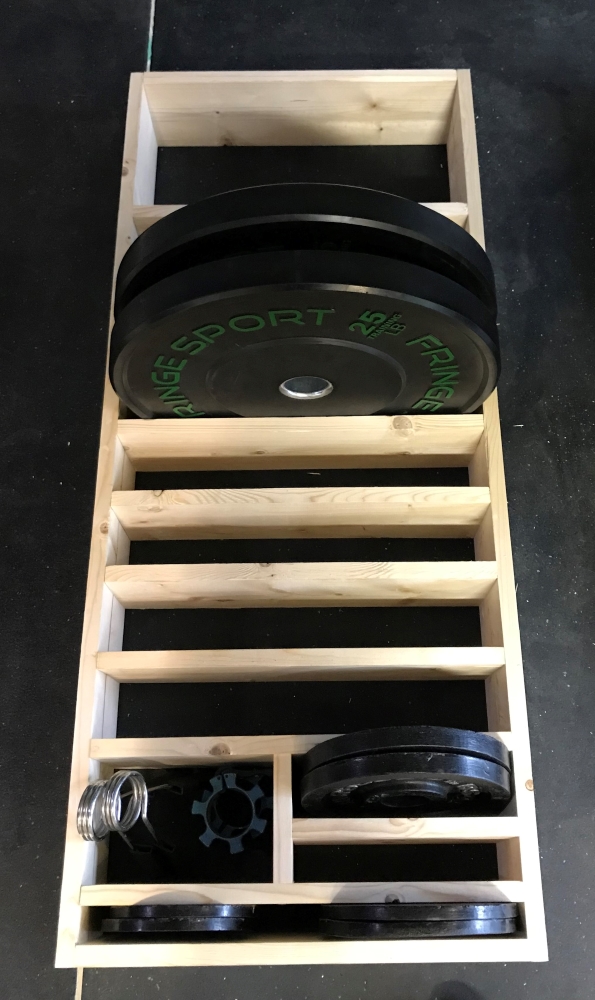
You’ll keep going like this until you run out of plates. If you’re like me and left a space at the end for future purchases, I’d just leave it open. That way you’ll be able to customize the fit for whatever plates you end up buying. In the meantime you can place some other junk here. By now your rack should be lookin’ pretty darn sweet, especially if you’ve gone ahead and filled it up with plates!


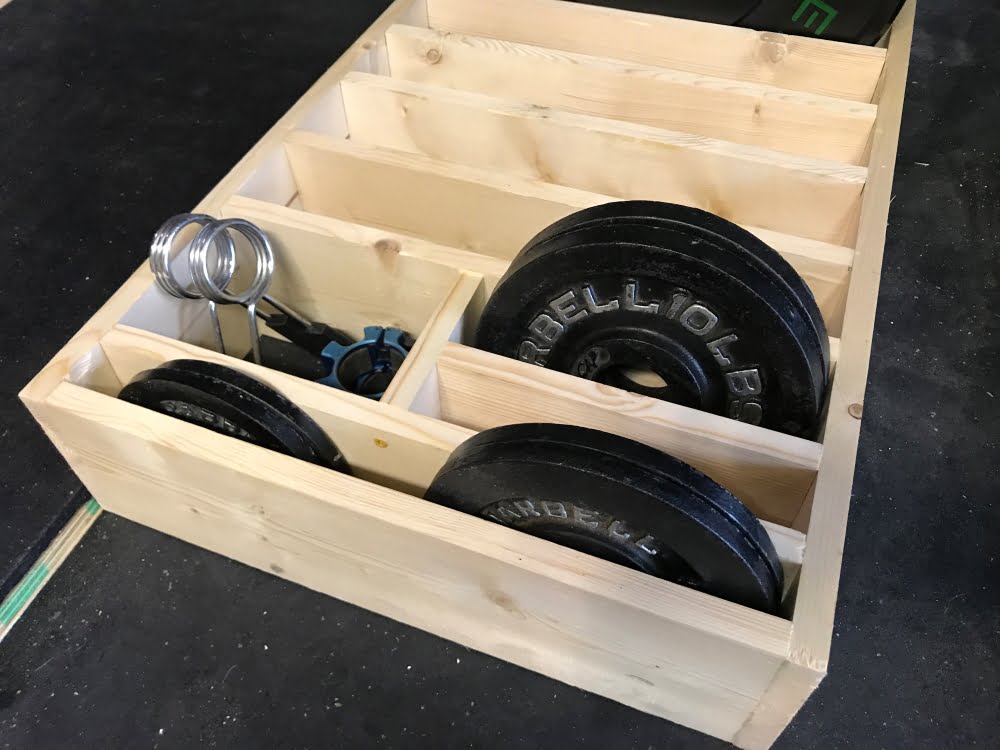
7. Nowwwww….back to this organizer. I made mine to accommodate a pair of 10 lb plates, two sets of 5 lb plates, a pair of 2.5 lb plates, and some barbell collars. I really like this set up as everything has its place! If you want something a little different, specific to your equipment, just spend a little time sketching out what you want on paper. It’s really up to you. Don’t be afraid to try some different variations to find exactly what you want.
Along those lines, another thing I suggest that will help you figure things out is doing a test-fit for your pieces. I cut all my pieces and placed them in the rack in the configuration I wanted before I screwed anything in or made it permanent. Doing it this way solidified that I had things the way I wanted and now I knew they fit. Actually now that I recall, I had cut one of these pieces just a little too big, so by doing the test-fit, I was able to see that I need to adjust and take just a little more off that one piece.

If you’re going to use the same set up I have here, the measurements are as follows–
Piece #1 is a regular divider- 17 ⅞” long
Piece #2 is about half that size- 9 3/8″ long
Piece #3 is even shorter, oriented perpendicular to those other pieces- 5″ long
After you’ve done your test-fit and are happy with the sizes of the pieces and the overall configuration, you’ll attach these pieces together. First attach them to each other outside of the rack. Just like you did with the rack itself, hold the pieces together tightly to keep them lined up correctly. I attached piece #1 to piece #3 with a single screw. Then, I attached piece #3 to piece #2.
Once you’ve assembled this organizer, insert it into the rack and attach it to the rack by screwing it into the long side pieces on the right. A screw up top and one at the bottom for each piece should do it! Boom! Instant organization!
Optional Variations
You’re done!! Congratulations on your new custom-made bumper plate toaster rack. It looks awesome, no doubt. Below are some additional things you can do to the rack to increase its awesomeness. If you think of any others let me know down in the comments below!
1- If you have a lot of patience and some really nice, expensive bumper plates that you want to baby, you can sand and round all the edges of the rack that your plates might come into contact with. I almost did this, but I’m pretty careful with my stuff as is, and my plates are doing just fine with no damage so far.
2- If you want to be able to move your rack around the gym, consider adding wheels! You’d just need to add a sheet of plywood to the underside of the rack. Or, you could add a strip of wood on either side, so that you can attach caster wheels to the four corners. Boom! Instant mobility!
3- If you’re feeling especially creative and want your rack to look extra nice you can stain or paint it. I personally like the natural look of pine, but I can see how a rich stain or a bold color could really make a rack pop!
Summary
If you’ve made it this far, hopefully you’ve got a wonderful new piece of storage hardware for your gym (or you’re about to!). Thanks for reading, and if you have any suggestions on how to make these DIY bumper plate toaster rack directions clearer, give extra info, or include certain shots please don’t hesitate to drop a comment below! If you’re considering a squat rack, have a look at my review of the Rogue S-2 squat rack. Happy lifting and making!


Great tips. FWIW I see you made a dimension correction and it seems you missed a collateral change. If this is 7 1/4 deep than that is “by 8” dimension lumber not “by 6.” A 1×8 is 7.25 wide and a 1×6 is 5.25 wide.
Hi and thanks for the comment! This is not my area of expertise, but I’m always trying to learn and putting out the correct info is important! I just measured again and the boards are actually about 5.5” in width, so I believe “1×6” is what they are. Is this an uncommon dimension for lumber to be? I just bought it at this width and didn’t rip it down lengthwise at all. Again, any additional info you’d like to share is appreciated!
Looks great !!! I would like to build this but I couldn’t help notice that the boards look like 1” X 6”. Are my eyes deceiving me ?
Holy Cow, I just checked and you are absolutely right! They are 1×6’s. Well don’t I feel silly. I’ll update this article to reflect the correct measurements. Good luck building your rack! And good eye! Thanks so much for the helpful comment.